Talend Data Integration Certified Developer Exam Questions and Answers
You have a tMap component configured with a single input row1and three outputs: CA, NY, Rejects. The input row1 consists of two columns. Name and State, containing the following data:
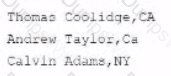
All outputs map only the Name column from row1, but CA employs a filter expression, CA.equals(row1.state), while Ny employs a filter expression, NY. Equals(row1,State). All Rejects have no such configuration.
Under these conditions, how does data flow to the outputs?
Options:
CA:Thomas Coolidge Andrew TyalorlNY;Calvin Adams;rejects;none
CA:Thomas Coodge;Calvin Adams; rejects:Andrew Taylor
CA:Thomas Coolidge;Ny:Calvin Adams;rejects:Thomas Coolidge, adrew taylor, Calvin Adame
CA:Thomas Coolidge, Andrew Taylor;Ny:Calvin Adams; rejects:Thomas Coolidge, Andrew Taylor,Calvin Adams
Answer:
BExplanation:
The tMap component allows you to configure multiple outputs for your data transformation and mapping. You can apply filter expressions on each output to filter out the rows that meet certain criteria. For example, if you want to send only the rows that have CA as the state value to one output, you can use CA.equals(row1.state) as the filter expression for that output. The filter expression evaluates to true or false for each row, and only the rows that evaluate to true are sent to the output. In this case, only Thomas Coolidge and Andrew Taylor have CA as their state value, so they are sent to the CA output. Similarly, only Calvin Adams has NY as his state value, so he is sent to the NY output. The Rejects output has no filter expression, so it receives all the rows from the input by default. However, since there is a conflict between the CA and NY outputs and the Rejects output, only the rows that are not sent to any other output are sent to the Rejects output. In this case, there are no such rows, so the Rejects output receives no data. References: Talend Open Studio: Open-source ETL and Free Data Integration | Talend,
Which Action on table operations are supported by a tMysqlOutput component?
Choose 3 answers
Options:
Drop table if exists andcreate
Create table
Replace
Drop table
Create table if does not exists
Answer:
A, B, EExplanation:
The tMysqlOutput component is used to write data into a MySQL database table. The Action on table parameter of this component allows you to specify what operation to perform on the table before loading data into it. The Action on table parameter supports the following operations:
- Drop table if exists and create: This operation drops the table if it already exists in the database and creates a new one with the same name and structure as defined in the schema.
- Create table: This operation creates a new table in the database with the name and structure as defined in the schema. If a table with the same name already exists, an error will be raised.
- Create table if does not exist: This operation creates a new table in the database with the name and structure as defined in the schema only if there is no table with the same name already existing in the database. If a table with the same name already exists, no action will be taken.
The Action on table parameter does not support the following operations:
- Replace: This is not an operation on the table, but on the data. The Replace parameter of the tMysqlOutput component allows you to specify whether to replace existing rows in the table with new rows based on a key attribute or to insert new rows only.
- Drop table: This is not an operation on the table, but on the database. The Drop table parameter of the tMysqlConnection component allows you to specify whether to drop the table after closing the connection or not. References: Talend Open Studio: Open-source ETL and Free Data Integration | Talend, [tMysqlOutput properties - 7.3], [tMysqlConnection properties - 7.3]
Which statements are true about configuring the input sources of a tMap component?
Choose answers
Options:
You can use the up and down arrows to interchange the order of the Lookup tables.
Thy main input source is always placed on topand cannot be moved within the tMap component.
The main input source will always be placed on top by default hut ran be dragged to any position.
The order in which the input sources appear on the map does not matter, provided the joins are configured correctly.
Answer:
A, BExplanation:
The tMap component allows you to configure multiple input sources for your data transformation and mapping. The main input source is always placed on top of the tMap component and cannot be moved within it. The main input source provides the data flow that drives the processing of the tMap component. The lookup tables are placed below the main input source and can be reordered by using the up and down arrows on the toolbar. The order in which the lookup tables appear on the tMap component does not affect the functionality of the joins, as long as they are configured correctly with the appropriate join conditions and expressions. References: Talend Open Studio: Open-source ETL and Free Data Integration | Talend, [tMap properties - 7.3]
Which methods car you use to specify the schema in a tFilelnputDelimited component?
Choose 3 answers
Options:
Drag a generic schema metadata item onto the Designer.
Add the component then drag and drop a generic schema metadata item onto the component.
Add the schema to the component using the Schema Editor
Drag a File delimited metadata item from the Repository onto the design workspace.
Add the component, open the Component view, select the Built-in schema type, then click the Edit schema button.
Answer:
B, D, EExplanation:
The methods that you can use to specify the schema in a tFileInputDelimited component are:
- Add the component then drag and drop a generic schema metadata item onto the component. This method allows you to reuse an existing schema that is stored in the Metadata section of the Repository. A generic schema is a schema that is not associated with any specific file format or connection type. You can create a generic schema by right-clicking on Generic Schema in the Repository and selecting Create Generic Schema.
- Drag a File delimited metadata item from the Repository onto the design workspace. This method allows you to create a new tFileInputDelimited component with a predefined schema that is based on a specific delimited file. A File delimited metadata item is a metadata item that contains information about a delimited file, such as its path, format, encoding, field separator, etc. You can create a File delimited metadata item by right-clicking on File delimited in the Repository and selecting Create File delimited.
- Add the component, open the Component view, select the Built-in schema type, then click the Edit schema button. This method allows you to create a custom schema for the tFileInputDelimited component within the Component view. A built-in schema is a schema that is defined locally for a specific component and cannot be reused by other components. You can edit a built-in schema by clicking on the Edit schema button in the Basic settings tab of the Component view.
You create a Job consisting of two subJobs, A and B. You added Joblet C with the intension of running it between A and B.
What are the minimum requirements to orchestrate this?(Choose Two)
Options:
Add TRIGGER_INPUT and TRIGGER_OUTPUT components into A.
Link A, B and C using On Subject Ok triggers.
Add TRIGGER_INPUT and TRIGGER_OUTPUT components into B.
Add TRIGGER_INPUT and TRIGGER_OUTPUT components into C
Answer:
B, DExplanation:
To create a job consisting of two subjobs, A and B, and add a Joblet C with the intention of running it between A and B, you need to do the following steps:
- Design subjob A by adding components and links to it in the Designer workspace.
- Add a Start component to mark the beginning of subjob B and link it to subjob A using an OnSubjobOk trigger.
- Design subjob B by adding components and links to it after the Start component in the Designer workspace.
- Add a tJobletTriggerInput component to your Joblet C design and link it to other components in your Joblet using data flows or triggers.
- Add a tJobletTriggerOutput component to your Joblet C design and link it to other components in your Joblet using data flows or triggers.
- Drag your Joblet C from the Repository tree view to the Designer workspace between subjob A and subjob B.
- Link your Joblet C to subjob A using an OnComponentOk trigger from the last component of subjob A to the tJobletTriggerInput component of your Joblet C.
- Link your Joblet C to subjob B using an OnComponentOk trigger from the tJobletTriggerOutput component of your Joblet C to the Start component of subjob B.
The minimum requirements to orchestrate this are adding TRIGGER_INPUT and TRIGGER_OUTPUT components into C and linking A, B, and C using OnSubjobOk triggers. These are generic components that allow you to define triggers for your Joblet without depending on specific components. You do not need to add TRIGGER_INPUT and TRIGGER_OUTPUT components into A or B, as these are regular subjobs that can use any type of components or triggers. References: Talend Open Studio: Open-source ETL and Free Data Integration | Talend, [tJobletTriggerInput properties - 7.3], [tJobletTriggerOutput properties - 7.3], [Joblets - 7.3], [Triggers - 7.3]
Which statements ate true about a tWarn component?
Choose 2 answers
Options:
Used alongside a tLogCatcher in order for the log data collected to be encapsulated and passed on to the output defined.
Used only in conjunction with the log4j feature.
Used to trigger a warning often caught by the tLogCatcher component for an exhaustive log.
Used only in conjunction with a iLogCatcher component.
Answer:
A, CExplanation:
The tWarn component is used to trigger a warning message that can be caught by the tLogCatcher component for an exhaustive log. The tLogCatcher component is a component that collects the log data generated by the tWarn, tDie, and Java Exception components and passes it on to the output defined. The tWarn component can be used alongside a tLogCatcher component in order for the log data collected to be encapsulated and passed on to the output defined. The tWarn component can also be used independently of the tLogCatcher component, but in that case, the warning message will only be displayed in the console. The tWarn component is not used only in conjunction with the log4j feature, nor only in conjunction with a tLogCatcher component. The log4j feature is a logging framework that allows you to customize the logging level, format, and destination of your log messages. You can enable or disable the log4j feature in Talend Studio by checking or unchecking the Use log4j option in the Preferences menu. The tLogCatcher component can catch log data from other components besides the tWarn component, such as the tDie and Java Exception components. References: Talend Open Studio: Open-source ETL and Free Data Integration | Talend,
You are building a Job that consists of two subJobs being sequentially executedI he first subJob completes successfully.
Which component in the first subJob triggers the execution of the second subJob?
Options:
Start component
Final component
Input component
Any component
Answer:
AExplanation:
The Start component in a subjob triggers the execution of the next subjob in a sequential order. The Start component is used to define where a subjob begins and to link it with other subjobs within a job. The Start component has only one output link that can be connected to any other component in the same subjob or to another Start component in another subjob. When a subjob completes successfully, it sends an OnSubjobOk trigger to its Start component, which then activates the next subjob linked to it. The Final component, on the other hand, is used to define where a subjob ends and to perform some actions after its completion, such as sending anemail or logging a message. The Final component has no output link and does not trigger any other subjob. The Input component and any other component in a subjob do not trigger any other subjob by themselves, unless they are connected to a Start component through an output link or an OnComponentOk trigger. References: Talend Open Studio: Open-source ETL and Free Data Integration | Talend, [Start properties - 7.3], [Final properties - 7.3]
You want to use the value of a context variable you defined to configure a component, but you do not remember the exact name. You decide to use the auto-completion feature in Talend Studio Studio to get assistance.
Which keystrokes can you use to trigger auto-completion?
Options:
Fsc + Space
Ctrl + Alt + Space
Ctrl + Space
Alt - Space
Answer:
CExplanation:
To trigger auto-completion in Talend Studio, you can use the keystrokes Ctrl + Space. This will display a list of possible suggestions based on what you have typed so far. For example, if you type context. and press Ctrl + Space, you will see a list of all the context variables you have defined. You can then select the one you want from the list or continue typing to narrow down the choices. Auto-completion can help you avoid typing errors and save time when configuring components or writing expressions. References: Talend Open Studio: Open-source ETL and Free Data Integration | Talend
Which types of SQL templates does Talend Studio provide?
Choose 2 answers
Options:
Custom SQL templates
Use-defined SQL templates
System SQL templates
System-defined SQL templates
Answer:
B, CExplanation:
Talend Studio provides two types of SQL templates: system SQL templates and user-defined SQL templates. SQL templates are predefined SQL queries that can be used in various components that execute SQL statements, such as tDBInput, tDBRow, tDBOutput, etc. System SQL templates are provided by Talend Studio and cover common SQL operations, such as creating, dropping, or altering tables, inserting, updating, or deleting data, etc. User-defined SQL templates are created by the user and can be customized according to specific needs. User-defined SQL templates can be created by using the SQL Templates view in Talend Studio and can be organized into categories and subcategories. There are no custom SQL templates orsystem-defined SQL templates in Talend Studio. References: Talend Open Studio: Open-source ETL and Free Data Integration | Talend, [SQL Templates - 7.3]
You created a Job to process a customer database. Next, you want to debug the Job using Traces Debug and pause the execution when it encounters any records for customers residing in the state of California.
Options:
Add a breakpoint in the Advanced Settings tab of the Run view.
Open the Debug Run tab of the Run view and click Traces Debug.
Right-click the trace on the output of the input component and select Add Breakpoint.
Right-click the trace on the output of the input component and select Show Breakpoint Setup.
Answer:
DExplanation:
To debug a job using Trace Debug mode and pause the execution when it encounters any records for customers residing in the state of California, you need to right-click on the trace on the output of the input component and select Show Breakpoint Setup option. Trace Debug mode is a feature that allows you to trace each row processed by your job components and see the values of each column in each row. You can access this mode by opening the Debug Run tab of the Run view and clicking on Trace Debug button. A trace is a link that shows the data flow between components in your job design workspace.
The Show Breakpoint Setup option allows you to set a breakpoint on a trace based on a condition or an expression. A breakpoint is a point where the execution of your job pauses and waits for your action. You can use breakpoints to inspect your data or debug your logic at specific points of your job execution. You can access this option by right-clicking on a trace on your job design workspace and selecting Show Breakpoint Setup. This will open a dialog box where you can enter a condition or an expression for your breakpoint.
For example, if you want to pause your job execution when it encounters any records for customers residing in the state of California, you can enter this condition for your breakpoint:
row1.state == “CA”
This will make your job stop at the trace where this condition is met and show you the values of each column for that row.
You do not need to add a breakpoint in Advanced settings tab of Run view, open Debug Run tab of Run view and click Trace Debug button, or right-click on trace on output of input component and select Add Breakpoint option. These options are not used to set breakpoints based on conditions or expressions. The Advanced settings tab of Run view is used to configure advanced settings for your job execution, such as JVM arguments, statistics parameters, implicit context load parameters, etc. The Debug Run tab of Runview is used to access Trace Debug mode, but not to set breakpoints. The Add Breakpoint option is used to add a simple breakpoint on a trace without any condition or expression. References: Talend Open Studio: Open-source ETL and Free Data Integration | Talend, [Trace Debug mode - 7.3], [Breakpoints - 7.3]
Which method allows you to execute the compiled Job Talend Studio?
Options:
Click the Export button in the Edit Properties window.
Right-click the Job in the Repository and select Build Job
Right-click the Job in the Repository and select Export items.
Select Save As on the main File menu
Answer:
BExplanation:
To execute the compiled job outside Talend Studio, you need to right-click on the job in the Repository tree view and select Build Job option. This option allows you to export your job as an executable file that can be run independently from Talend Studio on any platform that supports Java. You can access this option by right-clicking on your job in the Repository tree view and selecting Build Job. This will open a dialog box where you can configure the build settings, such as destination folder, archive name, context, etc.
You do not need to click the Export button in the Edit Properties window, right-click on the job in the Repository and select Export items, or select Save As on the main File menu. These options are not used to execute the compiled job outside Talend Studio. The Export button in the Edit Properties window is used to export your job properties as an XML file. The Export items option is used to export your items (such as jobs, metadata, routines, etc.) as an archive file that can be imported into another project or workspace. The Save As option is used to save a copy of your job with a different name or location. References: Talend Open Studio: Open-source ETL and Free Data Integration | Talend, [Build Job - 7.3]
Which element carries data between two components in a Job?
Options:
Sublob
Link
Trigger
Row
Answer:
DExplanation:
A row is an element that carries data between two components in a Job. A row is also called a link or a connector. A row can be of different types, such as Main, Lookup, Reject, Iterate, etc. A subjob is a group of components that are connected together and executed as a single unit. A trigger is an element that controls the execution flow of a Job or a subjob. A trigger can be of different types, such as OnSubjobOk, OnComponentOk, RunIf, etc.
You need to set up a server in your Talend environment that enables several members of your team to collaborate on a project.
Which application must you enable before working on a remote project?
Options:
Git or SVN server instance must be running.
Talent Administration Center instance must be running with the team members and project configured.
Git or SVN client must be installed on each developed workstation.
Talend admission Center service must be running on each development workstation.
Answer:
A, BExplanation:
To set up a server in your Talend environment that enables several members of your team to collaborate on a project, you need to enable two applications before working on a remote project: Git or SVN server instance and Talend Administration Center instance. These applications are used to manage version control and collaboration for your project.
Git or SVN server instance is a server application that allows you to store and track changes of your project files using a version control system. Git and SVN are two popular version control systems that are supported by Talend Studio. You need to have a Git or SVN server instance running and accessible by your team members before working on a remote project. You also need to have a Git or SVN client installed on each development workstation to connect to the server and perform version control operations.
Talend Administration Center is a web-based application that allows you to manage users, projects, tasks, execution servers, and licenses for your Talend environment. You need to have a Talend Administration Center instance running and accessible by your team members before working on a remote project. You also need to configure the team members and project settings in Talend Administration Center to grant access and permissions for your project. References: Talend Open Studio: Open-source ETL and Free Data Integration | Talend, [Version control - 7.3], [Talend Administration Center - 7.3]
Which options can you use to add a Joblet to your talend Job?
Choose 3 answers
Options:
Use a tRunJob component and select the Joblet from the drop-down menu.
Type the Joblet name on the Studio canvas, then select if from the Palette drop-down menu.
Right-click the Joblet from Palette and select the Add option.
Drag theJobket from the Repository tree view to designer canvas.
Drag the Joblet from Palette to the design workspace.
Answer:
B, D, EExplanation:
To add a Joblet to your Talend Job, you can use one of these options:
- Type the Joblet name on the Studio canvas, then select it from the Palette drop-down menu. This will create a Joblet container on your canvas that contains all the components and links of your Joblet.
- Drag the Joblet from Repository tree view to designer canvas. This will also create a Joblet container on your canvas that contains all components and links of your Joblet.
- Drag Joblet from Palette to design workspace. This will open a dialog box where you can select an existing Joblet from Repository or create a new one.
You cannot use a tRunJob component and select Joblet from drop-down menu, nor right-click Joblet from Palette and select Add option. These methods are not available in Talend Studio and may cause errors or unexpected results. References: Talend Open Studio: Open-source ETL and Free Data Integration | Talend, [Joblets - 7.3]
You need to calculate the total number of rows in an input file using a tMlelnputDelimited component.
Which code should you use in a tJava component to write a nb-line variable?
Options:
Int nb_line-(integer)globalMap.put(‘’tFileInputDelimited_1_NB_LINE’’)
Int nb_line=(integer)globalMap.put(‘’tFileInputDelimited_1_NB_LINE’’)
Int nb.line-(integer)globalMap.put(‘’tFileInputDelimited_1_NB_LINE’’)
Int nb_line-(String)globalMap.put(‘’tFileInputDelimited_1_NB_LINE’’)
Answer:
CExplanation:
You need to use the following code in a tJava component to write a nb_line variable:
int nb_line = (Integer)globalMap.get(“tFileInputDelimited_1_NB_LINE”);
This code retrieves the value of the global variable tFileInputDelimited_1_NB_LINE, which stores the number of rows processed by the tFileInputDelimited component, and assigns it to an integer variable named nb_line. You can then use this variable to print or manipulate the number of rows in your Job. Note that you need to use globalMap.get, not globalMap.put, to access the value of a global variable.
How do you create an empty Joblet?
Options:
Create an empty Job, then export it as a Joblet by right-clicking it in the Repository.
Create an empty Jon and use the file menu to save it as Joblet.
Right-click Joblet Designs the Repository and select Create Joblet.
Right-clicking a space in the Designer and select refactor to Joblect.
Answer:
CExplanation:
To create an empty Joblet, you need to right-click on the Joblet Designs node in the Repository tree view and select Create Joblet option. This will open a dialog box whereyou can enter the name and description of your Joblet and select an icon for it. You can then design your Joblet by adding components and links to it in the Designer workspace.
You cannot create an empty Joblet by creating an empty job, then exporting it as a Joblet by right-clicking it in the Repository, creating an empty job and using the file menu to save it as Joblet, or right-clicking a space in the Designer and selecting refactor to Joblet. These methods are not available in Talend Studio and may cause errors or unexpected results. References: Talend Open Studio: Open-source ETL and Free Data Integration | Talend, [Joblets - 7.3]
